DispatchPi part 3: connect the frame 🖼️
Before diving into this section, I recommend downloading the FileZilla client, an FTP app to connect remotely to your Pi and transfer files to it. Since the Pi Zero does not have an ethernet port, we will be connecting to it over wifi in a headless setup.
We will be setting up the Pi for the first time and loading two main components:
- A first script to pull an image from a fixed URL and display it (
display.py) - A second fallback script to convert a local image and display it if the website cannot be reached (
image_transform_local.py)
Here are some more detailed links in case you run into any problems:
Prep Raspberry OS
Download the Raspberry pi imager, the official installation tool published by the Raspberry Pi Foundation. Then insert your blank SD card into your computer.
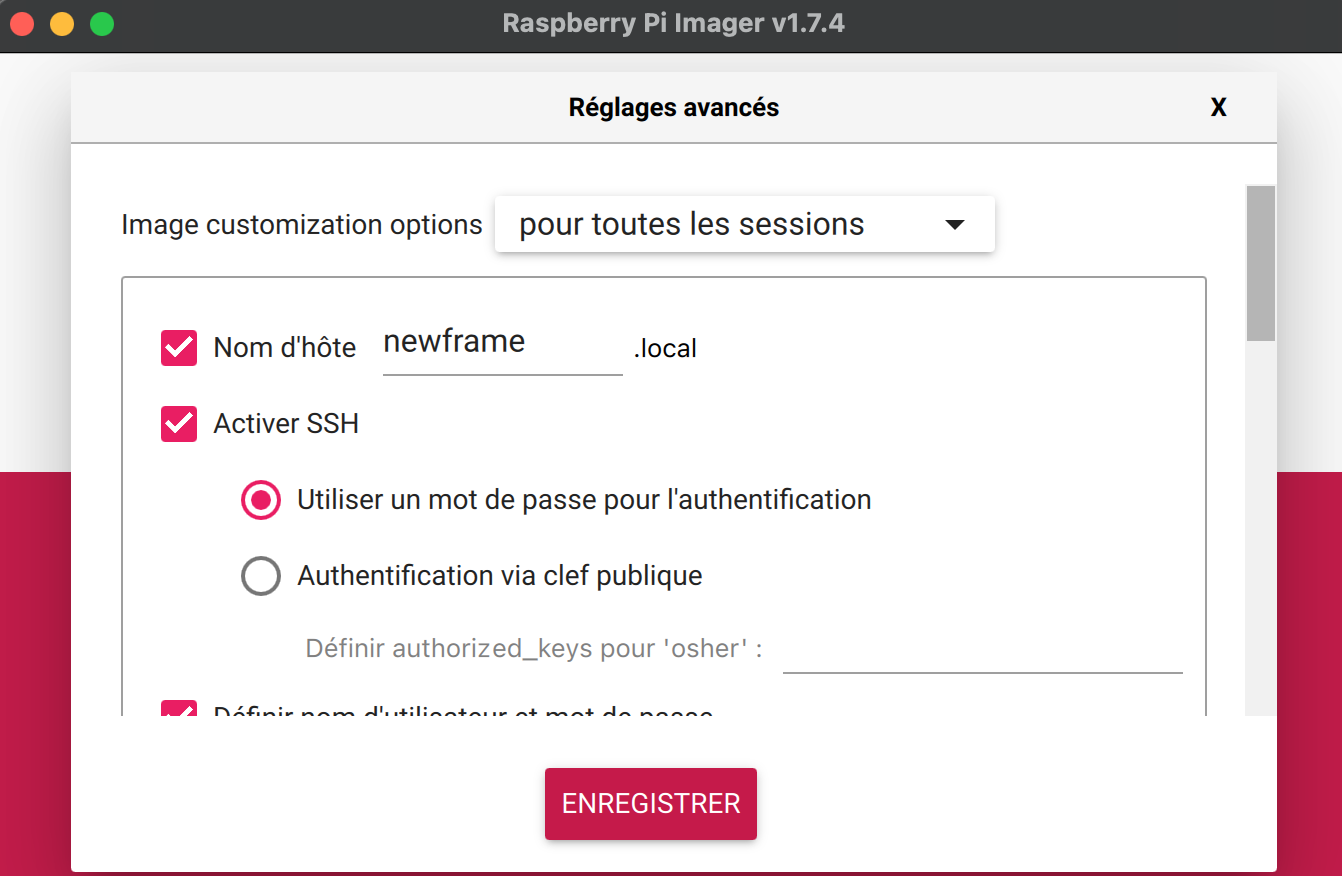
Open the program and press cmd+shift+x to view the advanced options menu. In the popup window, you can name your Pi and enable SSH access, which means you’ll be able to connect remotely into the Pi via a command line input, over wifi. Define the username and password you want to use for these SSH connections in the same screen. It’s important to provide your wifi network SSID and password, so that the Pi can connect to it when it boots up.
Customize the other options as needed. Setting a hostname will help you find the Pi on your wifi network. Set the username and password carefully, and note these down for later (note : my UI is in French but the options are the same)
Save your options and then pick Raspberry Pi OS Lite (32 bits) version. Choose your sd card and then start. Wait for the success message. Once the installation is finished, disconnect your SD card from your computer. We are not going to load our scripts directly onto the card, but rather connect to the Pi remotely and transfer them over wifi.
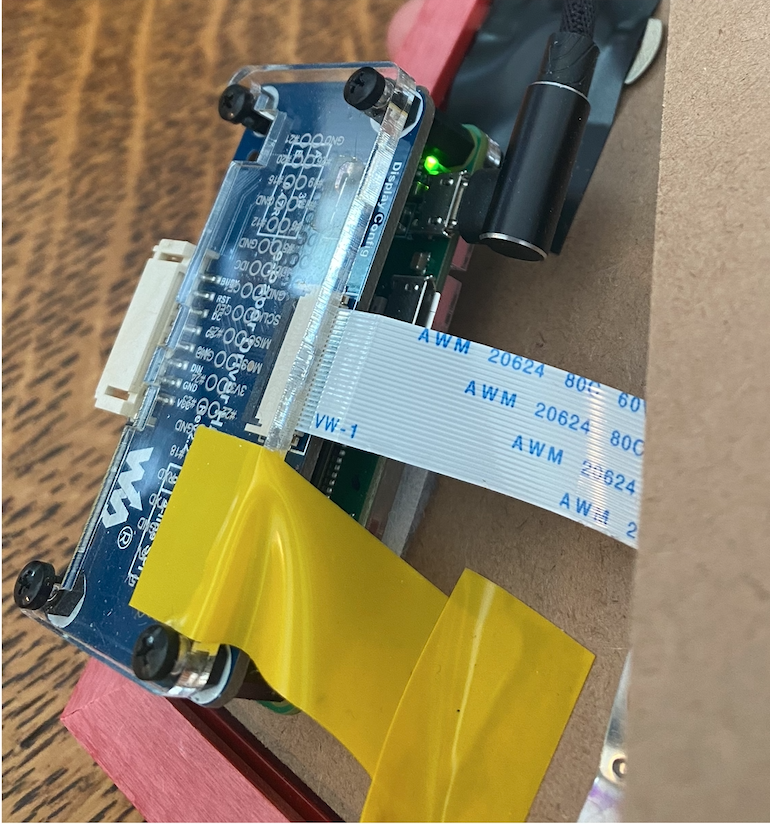
Insert the SD card into the Pi Zero’s memory slot, connect it to power, and watch it boot up! You should see a green light on the board, indicating that power is on. Do not connect the e-ink screen yet. Wait a few minutes till it completes its initial boot. The image below shows the green light on the Pi.
Connect with SSH
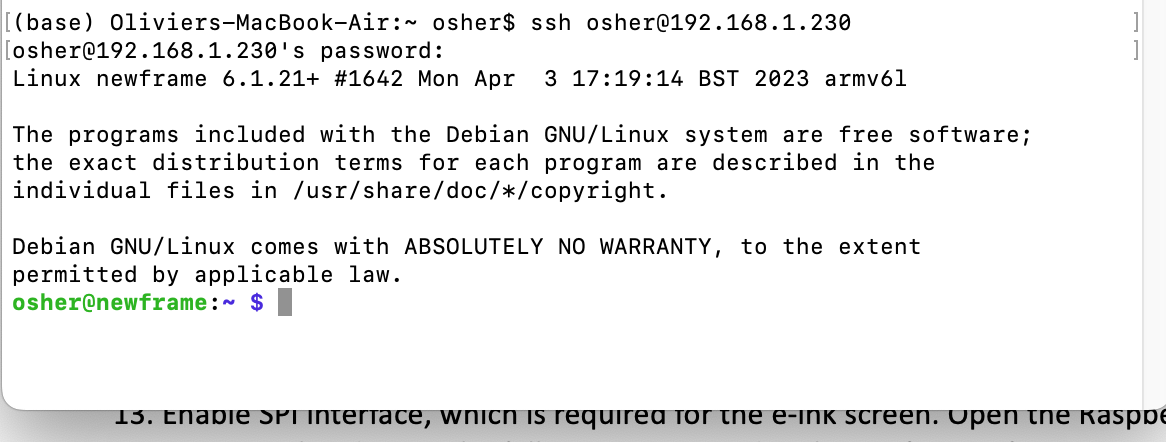
To SSH into the Pi, we need to finds its IP address in the local network. Login to your router’s admin panel, (typically 192.168.1.1), and look for the list of connected clients. Try to pinpoint the Pi’s IP. Look for the hostname you set in an earlier step in the Pi imaging tool.

If there are too many devices on your network and you can’t recognize any of the hostnames, you can google each device’s mac address, as these function like serial numbers that are registered to specific companies. Use HWaddress for example to look up a mac address.

Once you have the IP, open up the terminal app on macOS and connect via SSH by typing ssh USERNAME@192.168.1.230. Refer to the username and password you set above. Once you’re in, you should see a success message in your terminal, along with your Linux path.
Install libraries
Start by enabling the SPI interface, a iserial communication protocol that allows the Pi to communicate with the screen. Enter the following command to open the interactive config interface sudo raspi-config. Navigate with the keyboard keys. Choose Interfacing Options -> SPI -> Yes Enable SPI interface. You can now exit the config interface by choosing “Finish”. Reboot the pi with sudo reboot and reconnect via SSH once it’s back up. The sudo command instructs the Pi to run the command as an administrator. There are a few libraries to install next.
Linux libraries
- First, upgrade your system and install some libraries.
sudo apt-get update && sudo apt upgrade -y
sudo apt install python3-pip python3-venv
sudo apt-get install python3-pil python3-numpy libffi-dev libheif-dev libde265-dev python3-venv libjpeg-dev zlib1g-dev git-all libopenjp2-7
sudo apt-get install python3-dev
Python3 libraries
- Create a virtual environment to install the Python3 libraries with
python3 -m venv .dispatchpi_env - Activate the virtual environment with
source .dispatchpi_env/bin/activate - Verify you are in the right venv with
which python
pip3 install --upgrade pip
pip3 install RPi.GPIO spidev
Next, install the pillow-heif library to read HEIF/HEIC image formats locally on the Pi. This format is used by Google Photos. On a Pi Zero W, this library will not build wheels successfully due to an incompatible processor (armv6l). If you are using a Pi Zero W for this project, skip pillow-heif, comment out any code that uses it, and be sure to only use PNG or JPG images locally on your Pi instead of HEIF/HEIC images.
Note that you can check package versions on the Pi with : dpkg -l | grep libheif.
pip3 install pillow==9.5.0
pip3 install pillow-heif==0.11.1 # Do not run if you are on a Pi Zero W
pip3 install requests==2.31.0
Connect the screen
Plug the e-paper screen in two steps.
- First connect the extension cable to the screen (black latch)
- Then connect the HAT to the gpio board
I’m using a plastic frame to help attach the Pi on the back of the picture frame. It’s the MakerSpot Protector for 4-Port Stackable USB Hub HAT Compatible with Pi Zero W. The frames I’m using are from an arts store, nothing fancy, they are 5x7 frames for which I ordered custom mats from CustomMat.ca
Here are some pics of the setup.

Tests
Waveshare demo
Next, let’s run the waveshare demo to make sure the screen is working. Make sure you are still in the dispatchpi_env environment.
git clone https://github.com/waveshare/e-Paper.git
sudo python3 e-Paper/RaspberryPi_JetsonNano/python/examples/epd_7in5_V2_test.py
You should see patterns and images flashing on the screen, indicating the Pi can successfully control the screen!
Our code
Copy over all the files within the /screen subfolder of our repo with Filezilla to the dispatchpi_env folder of your Pi. You can add some fallback images to the screen/pics subfolder, which will be randomly displayed on the screen if it is not able to connect to the internet. Note that you may need to make sure the Pi’s drive is expanded to the full capacity of the SD card by running sudo raspi-config and going into the advanced options.
At this stage, it’s also important to edit the screen/display.py file with the URL of your cloud run website. You also want to point the frame to the right view (the subpage of your website) : either the image intended for the satellite frame, or the image intended for the earth frame. Edit line 30 of the code to do this. Disconnect from SSH by typing : exit
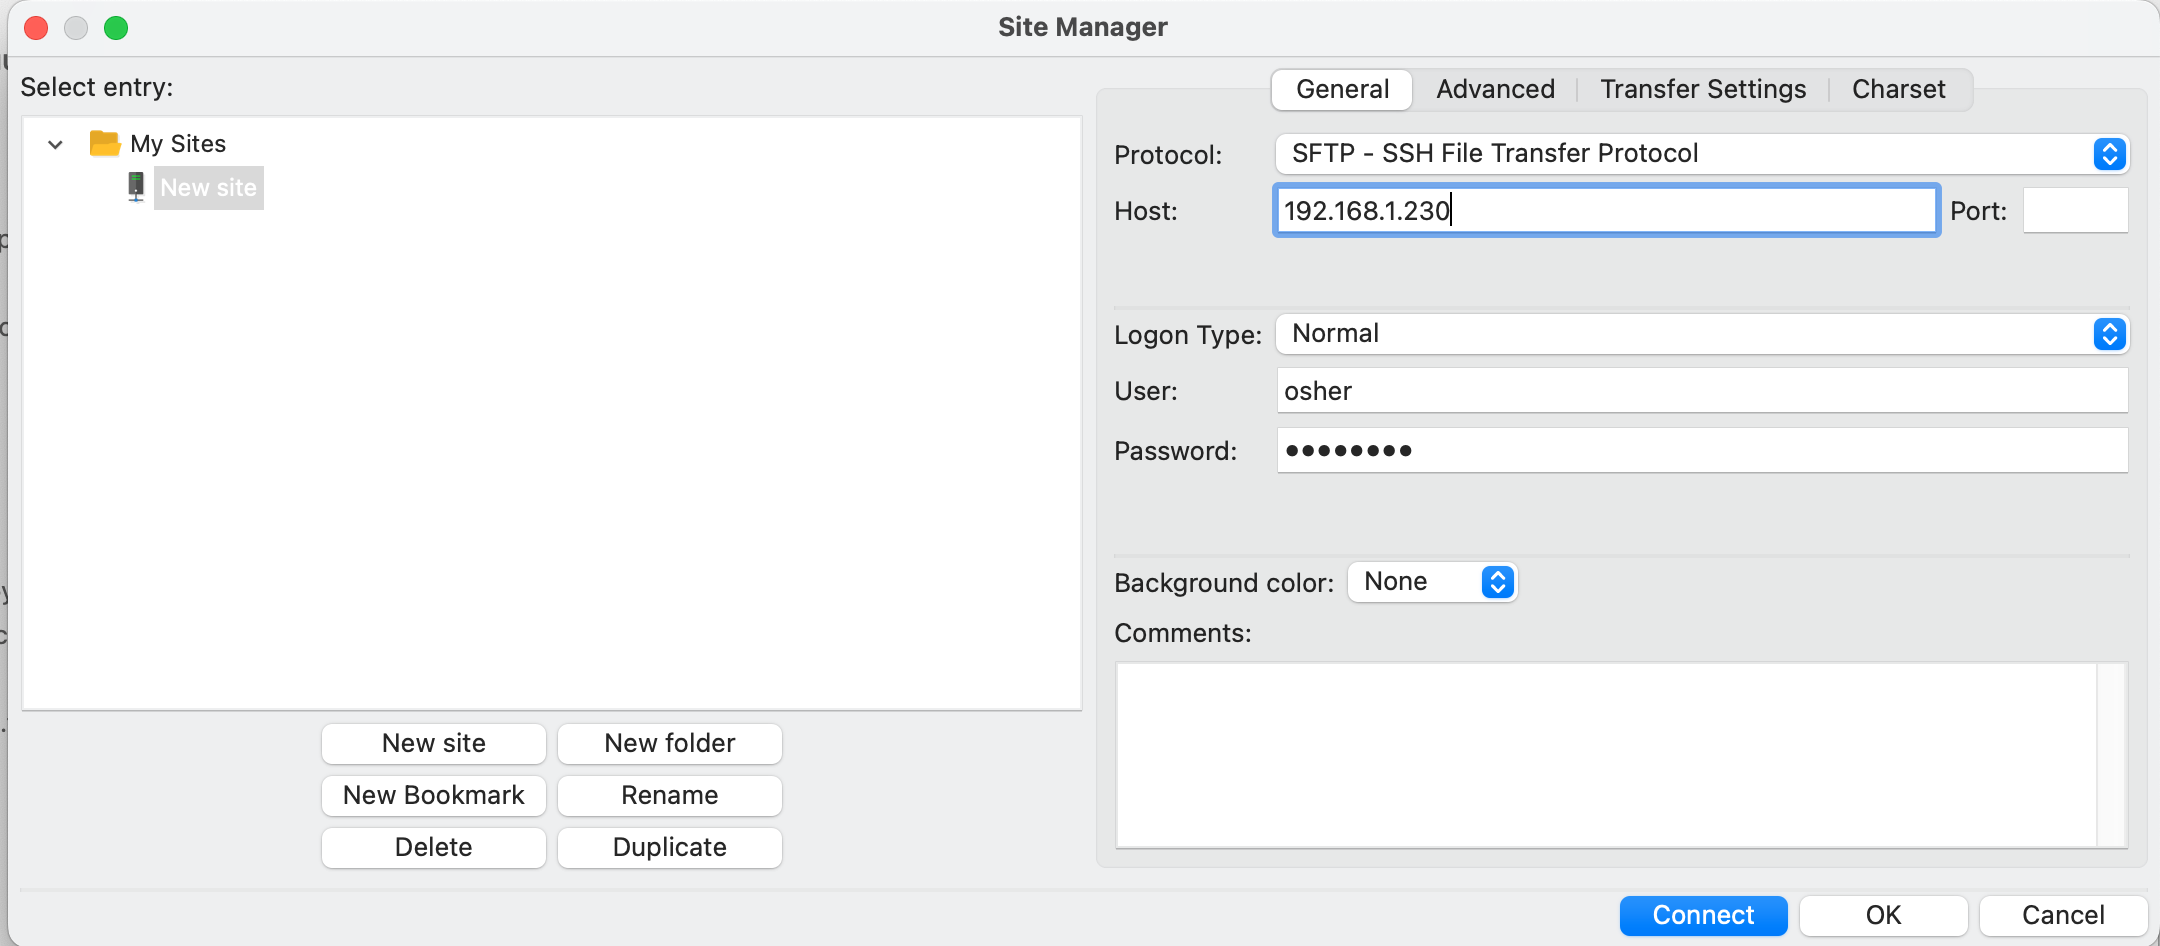
Open Filezilla, click on File>Site manager. Enter the information required to SSH into your Pi and then connect to it (in my case, I had set ‘osher’ as my username.)
You can now drag and drop the /server folder into the home directory of your pi. Let’s go back to our terminal and SSH directly into our Pi again. We’ll test our script with :
source .dispatchpi_env/bin/activate
python3 .dispatchpi_env/screen/display.py
The script will ping your Cloud Run app and retrieve the image intended for the satellite frame.
Automate it
The last step is our automate the script so that it runs at fixed intervals. We’ll use cron, a time-based job scheduler in Unix-like computer operating systems. A cron table is a text file that contains a list of commands meant to be run at specified times.
For more info on cron :
- How to run and schedule Python scripts on Raspberry Pi
- How to Run a Python Script on a Raspberry Pi at Startup
In the terminal, type sudo crontab -e to open the crontab file. If you are asked to pick an editor, select the first option (nano).
Try this script to run the file every three minutes, for testing purposes. The display.py script writes an output log to a file called image_log.log in the same directory. You can check it to debug your code, and you can change its logging level to DEBUG in the first few lines of the file to follow what’s going on more closely.
# DON'T FORGET TO UPDATE THE PI'S USERNAME (in my case it was 'osher'). You can double check paths easily within Filezilla.
* * * * * /home/USERNAME/.dispatchpi_env/bin/python /home/USERNAME/.dispatchpi_env/screen/display.py
# Run the script every day at 00:05 - use only this line when you're ready to go live!
5 0 * * * /home/USERNAME/.dispatchpi_env/bin/python /home/USERNAME/.dispatchpi_env/screen/display.py
# You can change the time by editing the first two numbers. For example, `0 0 * * *` will run the script every day at midnight. ChatGPT is helpful to compose a custom time requirement.
Save and exit the crontab (^X > Yes to save). It will suggest a save to a temporary directory - that’s fine.
Set up the second frame
If you want to avoid repeating all of these steps on your other frame, you can simply clone your microSD card (providing they are identical), or use a program like ApplePi Baker to backup the OS on the microSD card, before copying it to another card. You would only need to change the hostname, the backup images and the URL in screen/display.py to easily set up the second frame.
Manage wifi
A bonus step is to install a module to easily manage wifi connections, if the frame going to be used in multiple locations of which you don’t already know the wifi passwords. Autohotspot is a great tool to manage new wifi connections. I won’t go into explicit detail, but you can use option 2 in the following guide to add it to your Pi.